Wednesday, November 08, 2006

Revit Buildings Exported to AutoCAD Site Plans

Since Revit is lacking features in the site area, many companies still use AutoCAD for Civil/Site drawings. Many times the architects have started their building without importing the site plan. So when they import the site plan for the first time, they have to move it to match the building. They will eventually want to export the building outline to give to the civil guys to put in their AutoCAD site plan. So how do you get your building to export out of Revit so that it will match up exactly with the site plan?

1. First you need to draw a line in the site plan DWG file that starts at 0,0.

2. Then reload the DWG link into Revit.

3. You will now be able to see the line in Revit. (If you can't, make sure the layer that you created it on is currently turned on in Visibility/Graphics)

4. Next you want to select the menu item: Tools -> Shared Coordinates -> Specify Coordinates at a Point


5. With the new cursor: 
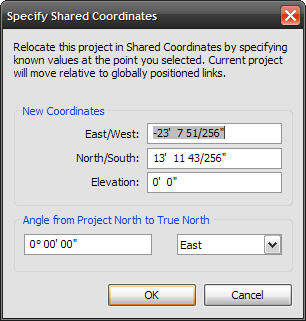
Choose the end point of the line in the CAD file that starts at 0,0.

6.A window will pop up with the current Revit coordinates. Replace the values of East/West and North/South with 0. This will shift the Revit coordinates to use this point as 0,0.


7. You can now export your building to DWG. You will want to go to the Options button and change the setting Coordinate System Basis to Shared.


8. Now you can xref the exported building into the site plan DWG with an insert point of 0,0.

Tuesday, October 03, 2006

Revit and Dual Core

A majority of the new computers sold today are coming with Dual Core processors. What is Dual Core? Dual Core is a computer with 2 processors (cpu) built into a single housing. What does it do? It allows Windows to split up processes (programs) to the 2 cpu's allowing more to run at once.

Revit unfortunately is what is called a "non-multi processor" application. This means that Revit cannot split itself over the 2 cpu's to process faster. It will only run entirely on 1 cpu. There are many programs that will take advantage of multiple processors, but not Revit.

Luckily, Revit users will still see an advantage with Dual Core systems. How? First, when running Revit, you are also running Windows (lots of processes), anti-virus, email, internet browser, and probably many more programs. With a single cpu, all of these programs fight for cpu cycles and can bog each other down. With Dual Cores you have twice as many cpu cycles for which to run all the same programs.

There is also a way to dedicate programs to a certain cpu. This means you could ideally, run all programs except Revit on 1 cpu and only Revit on the other cpu. How to do this? Here are two ways to do this. The only reason I show the manual method of using the Task Manager is because some people do not like or are not allowed to install other programs to their computers. Using SMP Seesaw is the best method of the 2.

Task Manager Method - This method takes some time to setup and resets every time you restart your computer.

  1. Open up the Task Manager by hitting CTRL-SHIFT-ESC or CTRL-ALT-DEL.
  2. Change to the Processes tab and scroll to Revit.
  3. Right-click and select Set Affinity... from the menu.
  4. In the new window uncheck one of the CPUs. The one that is checked will be the one you dedicate to Revit.
  5. Now do the same process for many of the other cpu intensive programs, but uncheck the opposite of the CPU you unselected for Revit. This will make those programs only run on the opposite cpu, freeing up the one you want to use for Revit.
  6. Some example programs are Email, Internet Explorer, AntiVirus, Firewall, Autocad, etc.

SMP Seesaw Method - A great piece of freeware by Mike Lin. This program allows you to quickly set which cpu a program is running on. Even better, it allows with the click of a button to isolate a program to one cpu and all other programs to the other cpu. I highly recommend this program.

  1. Download from http://www.mlin.net/SMPSeesaw.shtml and install.
  2. Run the program.
  3. Scroll down until you see Revit.exe and select it.
  4. Click the Isolate to CPU 1 button. This will move Revit to cpu 1 and all other programs to cpu 0. Sometimes there are a few programs that can't be moved, this is normal and these programs won't affect Revit much.
  5. Enjoy running Revit with close to 100% of the cpu available.

Friday, September 15, 2006

Highlights of Revit Building 9.1

Autodesk released Revit Building 9.1 a couple weeks ago with only a handful of new features. This is probably the smallest feature set to date that has been released from the Revit team.

Here are some of the new features added to Revit Building 9.1:

  • Interoperability
    • Enhancements to DWF exports
      • Rooms and Area properties export to DWF
      • Element GUIDs included in export to DWF
    • Import and Export with PNG image format
    • Export Room/Area reports to HTML
    • Specify building type and zip code for gbXML files
  • Views
    • Hide Elevation Tags per scale
  • Modeling
    • Moving end-joined components
      • New grip point where multiple object's endpoints come together
      • The grip will move all the components together without breaking the connection
    • Trim/Extend now works with braces and beams
    • Creation of non-planar beams
  • Details and Annotations
    • Revision clouds and tags have a new visibility option
    • The option has three options:
      • None - does not show cloud or revision tag
      • Tag - displays the tag and draws the cloud but makes it not visible
      • Cloud and Tag - displays the cloud and tag
    • New area property for filled regions

Thursday, September 14, 2006

On Demand Element Borrowing in Worksets

Worksets are one of the most powerful, yet most loathed parts of Revit. Worksets allow users to open and checkout portions of the project, allowing multiple people to work on a project. Up until release 8.1, the workset process was painful and required a lot of attention and maintenance.

The pre-8.1 process required someone to create a workset structure and then continually modify the structure as the project progressed. Workset users would need to make sure everything went to the right workset, that they didn't check out to many worksets, and then the most irritating thing... element borrow requests. Whenever someone wanted to work on something in the project that was in a workset someone else had checked out, they had to submit a borrow request and then wait for the other person to grant/deny permission.

Well, fortunately all of this changed in 8.1, but many users of Revit aren't aware of it. In 8.1 the Revit developers introduced a new concept that allowed on demand element borrowing. This new process allowed the software to control borrow requests automatically. This allows anyone to work on elements on any workset. So how does this work?

The setup of worksets is the same. Someone can create a structure of worksets to store elements in. The main difference is to not check out any worksets. Users should only open worksets, but not check them out for editing. If no one has a workset editable, then Revit will manage element borrow requests automatically.

All of the objects will show a puzzle piece icon when you select the object. This puzzle piece means that the element is on a workset that you do not have open for editing. Once you try to change the element, whether its by moving, deleting or changing its properties, Revit will check the central file and communicate with other users that have the project open. If none of the other users have changed that element, Revit automatically grants you permission to borrow that element. If the element has already been borrowed by someone else, Revit will pop up a dialog box saying that the element is already in use by another user and that they would need to relinquish the element before you can change it. To relinquish, you just save to central and all borrowed elements are relinquished.

With this new way of working with worksets, projects are now very scalable to the number of people that can work on a project at once. Since Revit does the element borrowing in the background, most users can work on a project without having to worry about worksets. I have even seen projects where the entire project is done with all elements in one workset.

Friday, August 11, 2006

Strapping in

Sit down, strap on your harness, and get ready for the Revit Coaster to begin. This blog is to highlight the ups and downs of Revit.